Showing posts with label treatment. Show all posts

Monday, July 18, 2016

BABYLISS


BABYLISS PARIS
Home Light Connected IPL

Hair hair everywhere and the only place I really want it growing is on my head! So seriously it's
about time I cottoned onto the IPL band wagon and got my body sorted! HA-LA-LOO-YA!

Growing up I hit puberty pretty early on compared to my friends. EVERYTHING changed when I
hit my 11th birthday. Boobs, butt, acne and yep hair in aaaalll the places! 

Needless to say I have been there and done that with all the different hair removal methods out
there. From shaving, hot waxing, cold waxing, wax strips, re-usable wax, hair removal creams,
epilators, tweezers... the list goes on! However for some reason I have never really considered trying
IPL. I guess mainly due to the fact that a single treatment can cost upwards of $800 or more and you
have to keep going back again and again, each time draining your bank account completely.

However, now that the gods have invented an at home IPL treatment you can DIY, I am so there
and the results have been so good I cannot wait to share my experience with you, so here we go!


Firstly, let's take a look over this nifty little device which is surprisingly quite light when you think
about how much work it does! In your kit you will find everything you need to get you started on
your journey to smooth hair free skin where ever you want on your body. The BaByliss Home Light
Connected can be used ANYWHERE on your body! From your legs, under arms, on your arms,
bikini and your full on brazilian area to your face, eyebrows, upper lip, cheeks, chin, etc!

Left to Right - Detailed (and very helpful & handy!) instruction booklet, Power cord,
Protection googles and red laser cover which goes on the end of the Babyliss where the intensely
strong light comes out!

Over the past six months I have been logging and keeping track of my hair removal sessions each
fortnight with the convenient and easy to use Babyliss IPL phone app! The app is designed to help
guide you through the whole process and will also remind you when you're due for your next session!
So handy for me or I'd surely forget!

(Image above credit to http://babylisshairremoval.com.au)

The IPL has set settings 1-5 with one being the most gentle and recommended to begin with or if you
have sensitive skin or fine hair. Then as you go higher, as you would expect the pulse becomes more
intense and slightly painful, however don't get scared just yet, I promise you it isn't anywhere near the
pain you might be thinking. I would say I have about medium to course hair and I predominately
stuck on the 3-4 pulse setting (after beginning on the recommended first setting and not feeling
anything at all I quickly stepped it up a notch or two!) and it doesn't feel much more then a quick
annoying horse fly bite over and over again. In my opinion this is honestly less painful than using an
epilator or waxing.
(Image above credit to http://babylisshairremoval.com.au)

Wearing the protective googles might look a bit funny, kinda like a super fly, however are 100%
essential to your safety as the IPL light is dangerously bright for the naked eye. Even with my eyes
closed I could clearly see the flashes through my eyelids! Not even kidding! Safety first. :)

As you can see after the first few sessions I look this picture to show the patches of bare skin on
my legs where the hair has already seemingly stopped growing! I couldn't believe the quick results
and quickly realised my poor technique in using the machine and not getting all the areas.


Practice makes perfect and after a few more sessions I got the hang of it and am noticibly seeing less
and less hair on not only my legs, but also under my arms, bikini line and even my big toe! (Yep hair
grows there too I'll admit it!) >_<

The first 4 treatments are conducted every fortnight with the time varying from 1-10 minutes
depending on the area of the body. After that it's recommended to keep up the treatments every
4 to 8 weeks until all the hair is gone.

Most of my hair has stopped growing now, however I do still see the odd stray every now and then
from places where I have missed and when I get time I get this nifty little device out again late at
night once the kids are all in bed and I zap away at them as I watch TV or catch up on watching
Youtube videos and emails.

So if you've ever thought about IPL but haven't had or wanted to spend that crazy amount of money
it costs to go to a salon for session after session, then I would highly, HIGHLY recommend going
and picking up your own at home private DIY IPL machine like this very affordable, easy to use
and top quality one by BaByliss. You will not regret it! The results for me have been HUGE and
such a worth while investment.

BaByliss currently have a 120 day trial offer, so if you're not 100% with the device you can get your
money back. (T's & C's apply!) It also comes with a 2 year warranty.

The BaByliss IPL is currently available to purchase right now here in Australia from 
The Shaver Shop, Target, David Jones and Myer for RRP $750!

Also check out the BaByliss IPL just for men here!

Have you ever tried the IPL hair removal method?
I would LOVE to hear about your experiences in the comments below!


Let's follow each other! 

*This product was kindly sent to me for consideration/review
*All photographs & video are my own work & my opinions are all 100% honest & all my own

Wednesday, June 15, 2016

PURE SMILE


TEETH WHITER IN YOUR LUNCH HOUR

WITH A PURE SMILE TREATMENT!


If you have been reading my blog for the past two years then you would know I have kept it no
secret about my constant teeth whitening battle. I am a coffee drinker. I wouldn't say I am an addict,
however those coffee beans stain and yellow your teeth over time no matter how good your oral
hygiene routine is.

I have been drinking coffee for about twelve years and during this time I have used whitening
toothpastes and gels, foams, whitening mouth wash and toothbrushes promising a whiter polished
shine as well as at home DIY whitening kits. Some of these methods I did find to be slightly effective
and I did see some improvement particularly with the teeth foam, however I had never, ever gone in
for any kind of teeth whitening treatment session before until I was recently offered to go to a
60 minute treatment session with Pure Smile. Getting a professional whitening treatment is 
something I have always wanted to do, however just never found the time to get around to actually
booking in for one. How could I say no?


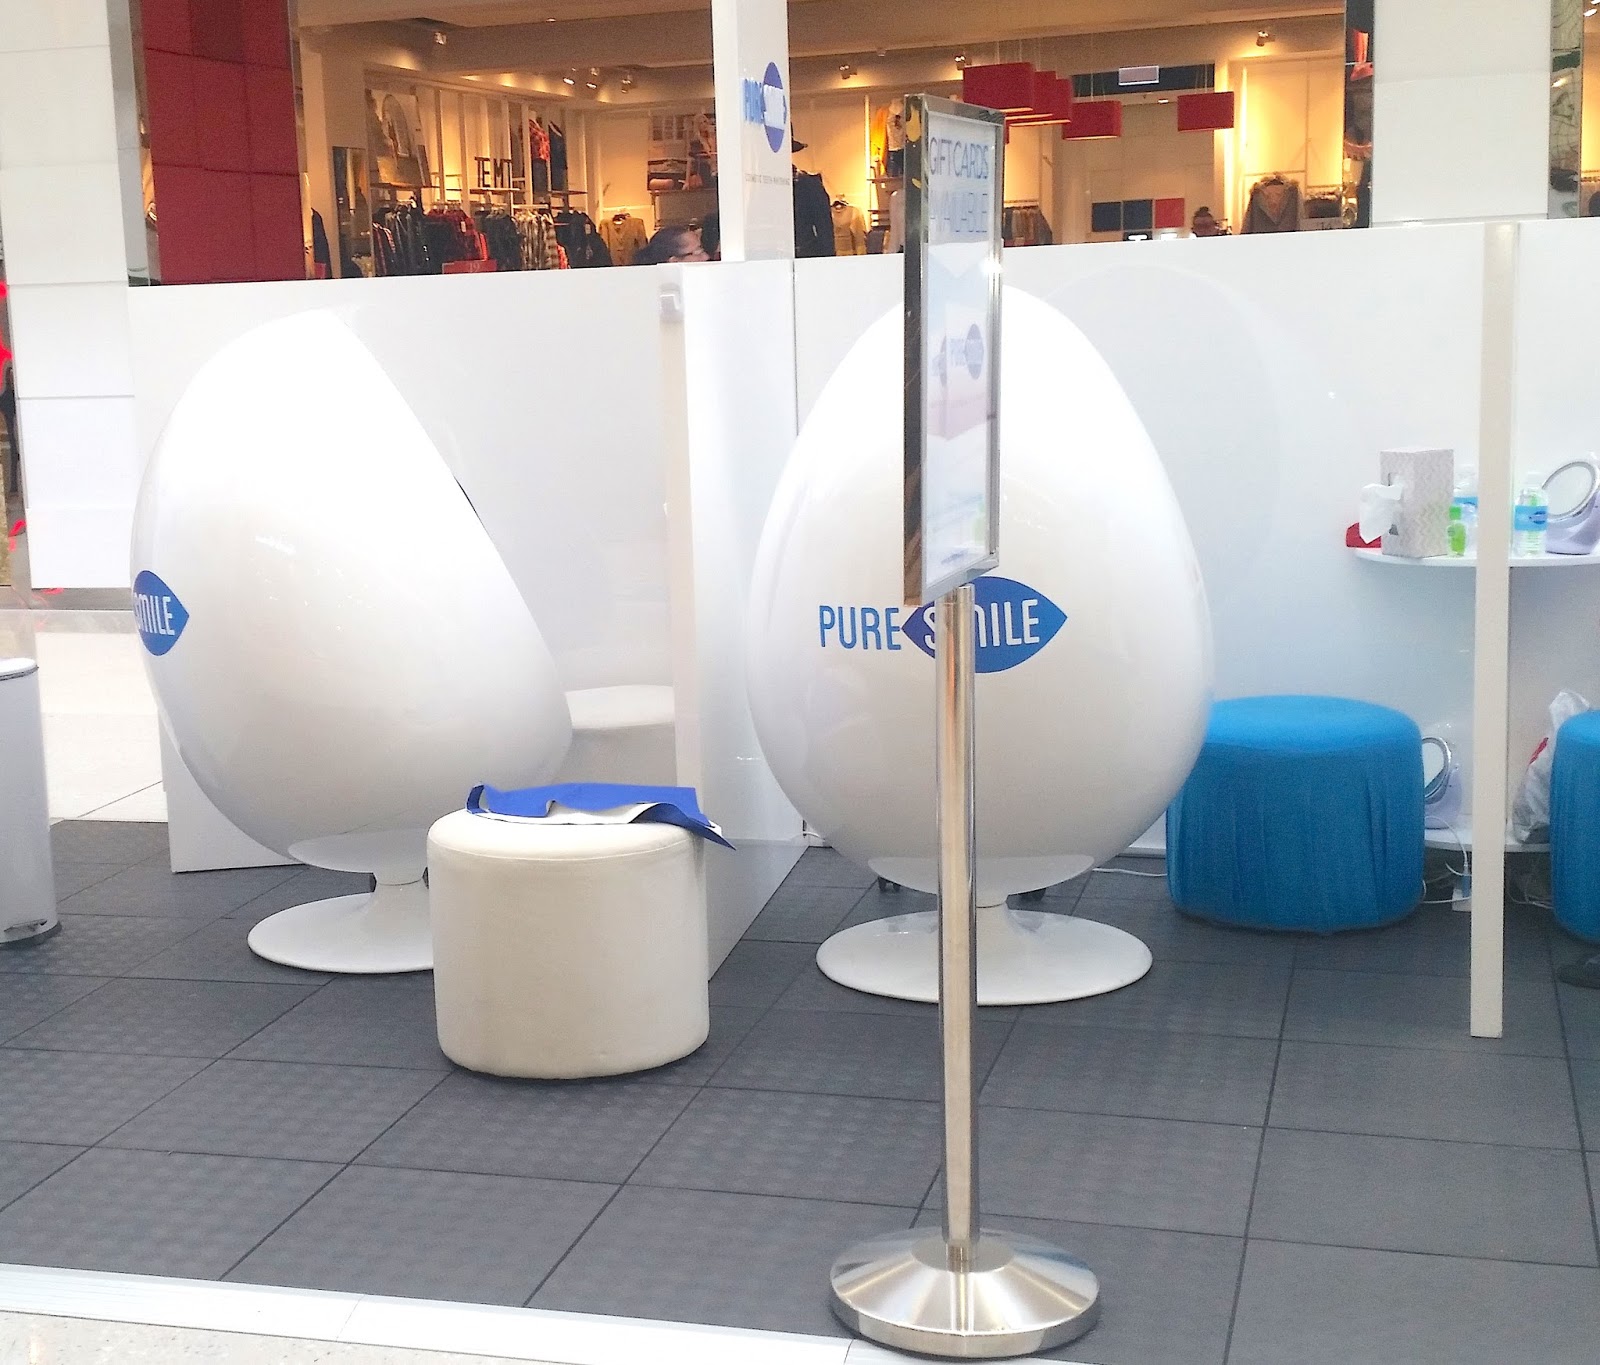
Upon arrival I was greeted by the lovely and very friendly Veronika at their Garden City kiosk who
quickly made me feel at ease and welcomed me to my home for the next hour in the very spacious
and comfy white egg chair! (See above).

Getting straight down to business Veronika presented me with two different sized mouth pieces to
choose from to wear throughout my treatment. The difference between each of the plastic clear mouth
 guards was only slight, however I went for the smaller option as I didn't feel my mouth was really on
the larger size.. :)

Before inserting the mouth plate which covered both the top and bottom teeth, the whitening
treatment gel was to first be applied to the front eight teeth on the top and bottom. The pen appeared
similar to those at home whitening pens you can purchase yourself. However ended up being much
more powerful when activated underneath the led blue light for an hour! (See before & after images
at the end of this post). Veronika held up a mirror for me to apply this liberally myself.


Once my teeth were nice and coated the mouth plate was inserted into my mouth and I was given 
some very funky 70's disco large red glasses to wear to protect my eyes from the super bright led
light throughout the treatment. The whitening machine was then put up to my mouth and at the end
I was required to gently just hold onto it in between my teeth so the light could activate the gel 
throughout my four 15 minute sessions. 


After the timer beeped to conclude each 15 minute session, I again used the treatment whitening pen 
to apply some fresh gel to my front 16 teeth. Pure Smile have thought about the impatient and easily
bored person here as there were also some headphones readily available to wear if I wanted to hook
my phone up and listen to some music. 


A few selfies and some precious alone time later (With two toddlers alone time is a precious a rare
thing!) it was time to take out the mouth guard and examine the results! I have to admit after just
over 60 minutes of having my mouth forced open it was a relief to finally take it out! If was a bit
difficult to conclude the results when I first looked into the hand held mirror right after taking off
the glasses I'd been wearing for an hour and only seeing red! However my eyes got to have a little
rest as the final stage of the treatment progressed.


To conclude the whitening treatment I was presented with a new mouth guard with some white
 squishy inserts in it which was a quick fluoride treatment which tasted minty, however I cringed
each time I had to swallow my saliva as there was nowhere in which to spit until the very end!
I can understand why we wear a nice large bib during this whole process and thank goodness for
all the tissues Veronika so kindly provided me with as well as a nice refreshing bottle of PureSmile
branded bottled water to rinse with and take home with me. :)


So in the end I couldn't wait to see how much whiter and brighter my teeth were! I was shown this
Bleaching Shade Guide below and as you can see, my teeth went from around an S28-S30 all the way
up to an estimated S10-S8! That's around 8 to 9 shades whiter! I am thrilled with this result and to be
honest, I knew my teeth weren't the best in terms of being bright and white, however I had no idea 
they were in fact this discoloured! I was slightly horrified and don't EVER want to go back to that
awful yellow tone again. And all mainly just from drinking coffee all these years. I have never 
smoked nor do I even drink any alcohol or wine! Coffee, why must you be so so bad but oh so good?


 BEFORE                                   AFTER

 If you are thinking of booking in for a PureSmile treatment I would highly recommend it as it is so
quick with sessions ranging from 30 minute ($127), 45 minute ($143) or 60 ($159) minute treatments and it is so affordable as well! Be sure to book online to gain this 20% discount offer!

PureSmile have locations in Sydney, Brisbane, Melbourne & Adelaide and you might be surprised to
know their treatments are 100% peroxide FREE and all natural. Completely and totally safe!

Have you ever had your teeth professionally whitened?

Let's follow each other! 

*Thank you PureSmile for this complimentary treatment
*All photographs are my own work & my opinions are all 100% honest & all my own

Sunday, April 3, 2016

SKIN B5


~  Skin B5 Skincare  ~
-

Click here to get 10% off your Skin B5 online order! 
Use #skinb5 at checkout! (Valid until 30/09/16)

Always up for trying new and different skincare and especially when it comes to acne fighting
products which target directly to the cause and treat the skin, then that is definitely something to
gain my attention and interest!

Being a acne sufferer since my pre-teens I have been there and done that with just about all the
different products and 'home remedies' you could think of. Previously I had tried and used up a
whole tub of Skin B5's Skin Purifying Mask and found the results to be quite satisfactory so when the
opportunity came to me a little while ago to test out more of the range I jumped at the chance!

Here are my reviews of each product I have been using over the past few months and how I feel
each product went and how it effected my skin and weather or not I would recommend each one
for those like me who suffer from adult acne.

-
Acne Control Cleansing Mousse (200ml)
Cleansing my whole face and neck twice daily has been the norm for me pretty much my whole life,
so making the switch over to this Cleansing Mousse was an easy feat. I have used cleansing mousse
type of acne targeted products before with really good results so I expected this to be the same.

I wasn't wrong! This product is amazing! So easy to use with the easy pump top dispensing just the
right amount of foamy goodness which I swear I could feel working on my skin as I massaged it in.
Removed all of that excess greasy feel from a long day or warm night without stripping my skin.
I left my skin soft and the few spots I had when I first began using this skincare range were instantly
less red and a little shrunken down. And this was just after the first cleanse! Impressive to say the
least!

Contains salicylic acid which seems to be loved by some and hated by others. I personally love it as
every facial cleansing product I have ever used with this ingredient has always worked at fighting my
acne very quickly. With my skin being 'normal' it has never dried it out whilst keeping the oil under
control. The Green Tea & Aloe Vera have a light scent and soothing feel on the skin and is very
moisturising and healing to the skin as well. RRP $22.95

Acne Control Moisturiser (100ml)
It is a hard task to find such a deeply moisturising facial cream that isn't greasy and soaks straight
down into the skin. It takes some detective work and I think with this Acne Control Moisturiser I
have found the one with the magic combination of ingredients including - Green Tea, Jojoba Oil &
Vitamin B5.

Whilst using this in conjunction with the Acne Control Cleansing Mousse and other Skin B5 products
below, the change I can see on the surface on my skin is pretty awesome. Even my pores, which are
one of my biggest annoyances appear to have shrunk down in size and are completely clear of any
gunk and dirt. It seems rare to find such a product combination to do this and I have only ever used
a few others which also have the power to do this successfully. RRP $22.95

Skin Purifying Mask (100gm)
If your acne is quite severe to begin with then I would recommend going full throttle using this mask
straight away a few times a week to let the specially formulated product really get to work in deeply
cleansing the skin and getting the oil production under control in order for the other products within
the Skin B5 range to aid in keeping the skin under control and healing from deep within so to prevent
any future break outs keeping the skin as clear as possible.

With hard working ingredients including - Avocado Oil, Peppermint, Bergamot Oil, Green Clay, Aloe
 Vera, Deep Sea Minerals and of course Vitamin B5 which you will find in all of Skin B5's products.

After the first two weeks of dedicated use 2-3 times a week I found cutting back to once a week was
all that was needed for my skin to keep up with being deeply cleansed and keeping clear and free of
dirt and impurities. This product is fantastic for those short on skincare time as it only takes 5 minutes
to dry onto the skin and can be simply rinsed away after that, it is that simple! RRP $34.95

Acne Control Capsules (x90 or 3month supply)
Honestly, I am not usually inclined to purchase or take any kind of vitamin or health supplement.
I just prefer the old fashioned way of portion controlled eating healthy with fruits and vegetables and
 all the other good stuff for a balaned diet. However since the reviews and reputation of these
 products I have heard and read about seem to all be so positive and with no nasty chemicals or
ingredients included I struggled to find a reason not to give them a fair chance.

One of the benefits I found really interesting and more appealing was the fact that both the Skin B5
capsules and tables not only help with keeping the skin under control working from the inside out,
it also works to relieve stress which is something that I really struggle with on a daily basis.

Recommended for mild to moderate acne sufferers who prefer a relatively smaller size capsule to
swallow. RRP $39.95

Acne Control Extra Strength Tablets (x180 or 30day supply)
These Skin B5 Extra Strength tablets are quite impressive in terms of claims. Here they are below -

Heal Skin & Small Wounds
Skin Renewal
Stress Relief
Oil Control
Supports Immune System

No wonder they are 'Extra Strength'! A bit of a larger tablet to take however this has never been an
issue for me. I have luckily always found taking tablets, even large ones easy. Those ones you are
recommended to take every single day whilst pregnant and breast feeding are giant suckers and I took
them with both my babies for more than 12months each time!

The recommended dosage is quite a lot to commit to, especially since in the beginning I wasn't all
that keen on taking supplements in the first place. However I had nothing to loose and my skin was
in the middle of a acne binge on my face with the main focus being on my cheeks, chin and the odd one on my forehead. These tablets and capsules are designs both for the face and body. I do get the
odd cluster of small bumps on my shoulders and upper back and these have now completely cleared.

I can't be sure if my stress levels have come down or my mood increased as my mind is a
complicated crazy place and with ongoing thyroid issues I don't know if these capsules and tables
have the capacity to take control of 100% of my hormones. RRP $49.95


Overall I have definitely noticed a dramatic improvement overall in my overall skin from using all of
 these products and have really enjoyed them all and found it very interesting and delightful with the
 clear results.

What are you skincare concerns?
Have you tried Skin B5 products?

Let's follow each other! 

*This product was kindly send to me for consideration/review
*All photographs, video & opinions are all 100% honest & all my own
-
I have included this article over at Fabulous & Fun Life's blog link up 'Monday Makeup Madness!' Check it out! 

Tuesday, February 9, 2016

NEWA


~  Homedics NEWA  ~

Demo & Review!
Having just turned 32 last month, I am becoming more and more aware and dedicated to my skincare
routine like never before. Since my early 20's I have always taken care of my skin mainly to help
keep my acne under control. Now a days I still very much stick to my twice daily skincare routine,
changing up the products and trying new ones whenever I get the chance. I have come to know
through trial and error what works for my skin and what doesn't.

Within the past 3-4 years I have come to notice a few little crows feet appearing and the bags under
my eyes are ever more present then they once were post having my 2 kids and sleeping like a regular
person. Now that I am busy looking after them full time as well as helping my husband run our
business, my Youtube channel and this blog amongst all the other responsibilities of everyday life,
sleep has become about a 6 broken hour a night luxury.


Now that you have the low down in short of my skincare history let me introduce to you a device I
have been using over the past few months which I believe has made an significant difference to the
appearance and age of my skin.

Newa is a skin rejuvenation system has been recommended by dermatologists from all over the world
 and is designed to lift, firm, smooth and tighten your skin, re-creating collagen within the skin.
Results can be seen as quickly as after the very first use with results being more obvious after a
 month.

The instructional DVD included with you Newa is great to watch before starting with the treatment
and gives you in depth detail on how to best use the Newa for ultimate long term effective results.


It is essential to use the Newa with the recommended Activator Gel for 5 sessions per week for one
 month and then twice weekly there after. The Activator Gel not only helps to protect the skin, it
 provides it's own facial treatment within itself giving your skin the ultimate at home spa collagen
 facial completely un-invasive and pain free!


Once you apply the gel directly to the device you then turn on the Newa. The indicator light will turn blue and once you have pressed the lit up button again it will begin to start flashing. This indicates it is ready to go. It is important not to exceed the maximum four minute treatment session once a day. You will know you are done as the device with light up from blue to green & give you a little buzz.


Apply the Newa device to the skin in and rotate in small circular motions. The Newa device is
designed to be used upon six sections of your face. The upper and lower cheek area or each side and
 then under the chin to help lift and firm the skin underneath on each side. There are two heating
levels. Newa recommends starting with the higher setting, however if it begins to feel too warm for
 your liking, you can always just switch it down to the low heat setting. Slowly you will begin to feel
your skin warming up, however it did not get hot or uncomfortable for me. Moving the device in
 larger circular motions on your face will tone down the feeling of heat a little if it does start to feel a
 bit too much.


Just like most facial treatments upon the end of each session you
skin will appear slightly reddened but shouldn't be sore, burning or irritated which mine was not.
I found the redness to not appear too bad on my face (I think my skin is pretty tough) and the redness
only lasted about half an hour before settling down again.


What I love most about the Newa Skin Rejuvenation System is that it does all of this in just four
minutes per session once a day! Being such a busy bee, this fits into my life with ease and has
 definitely been worth the extra time spent.

Has your skin developed any wrinkles?
Do you include any anti-ageing skincare products in your skincare routine?

Newa Rejuvenation System - $499.00 (Buy!)
Activator Gel - $59.95 (Buy!)

Let's follow each other! 

*This product was kindly sent to me for consideration/review
*All photographs & opinions are all 100% honest & all my own
*Not sponsored!

Wednesday, September 30, 2015

SUIGO


~ Suigo Haircare ~

http://www.suigoaustralia.com.au

Suigo Vital Nutrition Intensive Hair Repair Treatment
When it comes to hair repair treatments I really just can't get enough. It is up there with one of my
favourite things to do when it comes to treating myself when I get the little bit of extra 'me time.'

This thick, white formula is lightly fragranced with a fresh and light fragrance which is lingering 
with an air of perfume hours after using it. My hair has definitely benefited from it because I can 
really feel the difference in how soft and smooth it is as well as seeing less breakage after using my
hair brush.

Suigo Vital Nutrition Shampoo
Even though I only had the opportunity to try out the Suigo Shampoo & Conditioner in the 30ml
sample size tubes, I was able to get three washes from each which I feel like is just enough to be able
to give my opinion on how they worked for me. 

Again, the scent of these are light and quite refreshing as fragrance from them don't irritate my nose 
as I breathe them in deeply during my shower. The formula was white and a good consistency which
was easy to use and not too runny. It lathered up well into my hair and gave it that satisfying clean
feeling. I feel like this product in conjunction with using both the Suigo Treatment and Conditioner
has helped make a positive difference in my hair's overall health. 

Suigo Vital Nutrition Conditioner
If this wasn't labeled as a conditioner, I could easily mistake it for a hair treatment as the formula is
quite a bit thicker than my other conditioners on the rotation at the moment. To me, this is a good sign
as usually with this kind of product, the thicker the better when it comes to deeply nourishing my
hair.

I couldn't live without conditioning my hair as it does so many things. Smoothing, detangling, 
moisturising and of course treating and repairing it. This does all of the above and on a higher end
of the scale in my opinion. Definitely worth the premium price tag if you hair is in need of some 
serious love!

For more info about Suigo you can find them here. :)

How often do you treat your hair to a deep hair repair treatment?

Let's follow each other! 

*These products were kindly sent to me for consideration/review. 
*All photographs & opinions are all 100% honest & all my own

Monday, August 31, 2015

DREAM DOTS


~  DREAM DOTS  ~

http://www.dreamdotsforspots.com

Unless you're extremely lucky or have been blessed with incredible genes chances are you're suffered
from the odd break out of two (or a hundred!) in your lifetime. I know I have had my fair share and
over the past almost 20 years I have tried and tested countless amounts of bottles, potions and tubes
to try and get rid of them for good! I do have a few holy grails which I will continue to use for as
long as I feel I need to and at the moment I am also using these - Dream Dots!


What has me loving these are how unique they are! They are not just another facial wash, serum or
even gel. They are patches! Yes patches, similar to that of a cold sore patch which a fellow fav
blogger of mine pointed out to me recently.


They are small, discreet and so easy to use! You just pop one on over that annoying angry spot
and sleep with it on overnight. By morning the spot will have changed from clear to a whitish shade
and once you peel it off you will see you zit calmed right down. Less red and puffy and over the
period of a few days it will disappear completely! Not bad when it does all this whilst you sleep!

Recently I had a break out around my lower cheek area and wanted to get rid of them asap,
especially since I have been on a bit of a filming binge lately and nobody wants to be distracted by
that in a beauty video! So I madly stuck about 5 onto my face at once and over about 2-3 days my
face was pretty much back to normal. Yay!


For details on where you can purchase yourself some Dream Dots make sure you check out their
website for more info!

Have you heard of or tried Dream Dots before?

Watch my video review below!
Feel free to like, comment & subscribe! :)

Thanks for stopping by today! It was great seeing you! :)
Let's follow each other! 

*This product was kindly sent to me for consideration/review. 
*All photographs & opinions are all 100% honest & all my own

Tuesday, August 11, 2015

HAIR & ME


~  HAIR & ME  ~

Hair Rejuvenation Treatment

RRP: $19.95

My hair has had a hard tough life. You name it I've most likely tried it! From every hair craze or
trend which come and go as often as I wash my hair! Teasing, straightening, back combing, curling,
crimping, dying, chalking, bleaching.... it's all been there!

My latest obsession of late has been gradually going back to blonde. I used to bleach the absolute
crap out of my hair in my late teens/early 20's admittedly completely damaging the crap out of it to
the point of it beginning to fall out! And even then I couldn't stop. I loooved being a blondie!

So I am going back! But this time instead of DIY-ing, I'm leaving it to a professional and visiting the
salon. I am a jack of many trades, lightening my hair safely and properly is definitely not one of them!

Even though I have been lightening my hair gradually, going lighter means hair is always going to
be under more stress than usual and that means lots of TLC is required.

That's where this Hair & Me Rejuvenation Treatment has recently stepped into my routine to help!


This treatment contains coconut, macadamia, jojoba and almond oils which sounds like a delicious
blend all in itself so I am sure I don't need to go convincing you on just how wonderful and
deeply moisturising and nourishing it is to your hair. Not to mention the smell! Omg, the scent
of this treatment is 100% delicious and reminds me of one of my favourite sweet treats - Coconut Ice!

Sooo, as a blogger it's my passion to talkabout and share this stuff so don't even try to stop me, 
I can't and won't so don't even try, it's impossible! (Just ask my husband!) ;)

To me, this oily mix seems ultra concentrated because I found even a small amount (about the same
amount you would use to shampoo your hair) to be sufficient to get the job done. Even on my long
and relatively thick hair, the combination of oils seem to coat every strand of hair completely.

(Left - My hair after a few applications. So silky smooth & healthy! Right - With the treatment worked through my hair.)

Once the recommended time is up (30-45 minutes) and it's time to shampoo the treatment out, even 
as I am rinsing I can feel the difference in how my hair feels. It is smoother and silkier as I let the 
warm water rinse the oils away. Feeling like most of it has fused into the cuticles of each strand.

Once dry it has been a whole lot easier to manage! I don't even straighten it as much anymore
because the main reason I straighten my hair in the first place is to keep the constant frizz under
control, but now there is a whole lot less of that I can give my hair a break and let my natural
waves be wild and free ... and they actually behave themselves! No really! Now I can leave my hair
out loose the whole day without having to shove it up in a high pony or messy bun half way through
because my hair has driven me crazy and I just can't take it anymore! 

:)
(Hair & Me Rejuvenation Treatment coming out of the pack in the cold Winter air. Approx 8degrees!)

(Hair & Me Rejuvenation Treatment melted once warmed in your hand ready to apply!)

Vegan friendly & cruelty free! What's not to love?!

Hair & Me currently only stock a limited number of hair products, but since trying this one it's
clear to me their other products are probably worth a look at too!

Have you tried Hair & Me products?
What are your thought's on the benefits of hair oils?
Let's follow each other! 

*This product was kindly sent to me for consideration/review. 
*All photographs & opinions are all 100% honest & all my own